

Grilled Lemon Herb Chicken Avocado Orzo Salad with Honey Mustard Bacon Dressing

A Summer Salad That Eats Like a Meal (And Smells Like Heaven on the Grill)
You know those summer evenings when the grill is hot, the sun’s dipping just behind the mountains, and everyone’s miraculously in a good mood? This salad was born for nights like that.
It started as a way to use up leftover herbs from my garden and a few chicken tenders from the freezer. But once the honey mustard dressing came into play (hello, bacon magic), it transformed into something extra—the kind of meal that makes you pause after the first bite and say, “Wait, what is this?!”
It's smoky, sweet, tangy, herby, creamy, and crunchy all in one bowl. Perfect for backyard dinners, potlucks, or meal prep if you’re into that sort of responsibility.
Let’s get into it—you’ll want this in your rotation all summer long.
📝 Ingredients
For the Honey Mustard Herb Dressing
This is where the magic starts—don’t skip or skimp.
1/3 cup extra virgin olive oil
3 tablespoons honey
3 tablespoons grainy dijon mustard
Juice of 1 lemon
2 tablespoons white balsamic vinegar (or white wine vinegar)
1/2 cup chopped mixed herbs – rosemary, oregano, basil (fresh is best!)
1 small shallot, grated
2 cloves garlic, grated
Kosher salt, black pepper, and red pepper flakes to taste
For the Salad
It’s hearty, colorful, and bursting with texture.
3/4 pound boneless, skinless chicken tenders
1 bell pepper, quartered
1 pound dry orzo pasta (Jovial Cassava Orzo to keep it Gluten Free)
1 cup cubed sharp cheddar cheese(optional, but worth it)
1/4 cup crumbled blue cheese (optional, but worth it)
2 cups shredded red leaf lettuce
1 cup cherry tomatoes, halved
6 slices cooked bacon, crumbled
1 avocado, sliced
🔥 Instructions
1. Whip up the dressing
In a jar or bowl, whisk together all dressing ingredients until smooth. Taste and adjust seasoning—don’t be afraid of the salt and pepper here. You want bold flavor.
2. Marinate + grill the chicken
Toss the chicken tenders with about 1/3 of the dressing and let them marinate for 10 minutes.
Meanwhile, fire up your grill (or grill pan/skillet) to medium-high. Grill the chicken for 10–12 minutes, flipping halfway, until nicely charred and cooked through. Grill the bell pepper at the same time until it’s soft and blistered. Chop the pepper once cool.
3. Cook the orzo
Bring a large pot of salted water to a boil. Cook the orzo according to package directions until al dente, then drain. While still warm, toss it with the cheddar, blue cheese (if using), and another 1/3 of the dressing.
4. Assemble the salad
In a large bowl, combine orzo mixture with grilled chicken, bell pepper, lettuce, tomatoes, and crumbled bacon. Give it all a good toss, then gently fold in the sliced avocado. Finish with a drizzle of the remaining dressing and a sprinkle of flaky salt and cracked black pepper.
5. Serve it up
This salad is just as amazing warm as it is cold—great for lunch the next day if there are leftovers.
💡 Tips & Tricks
Herb Flexibility: No fresh basil? Sub in parsley or even dill. Use what’s in your fridge or garden.
Orzo Swap: Can’t do orzo? Sub with gluten-free pasta, quinoa, or even cauliflower rice.
Make Ahead: Marinate the chicken and mix the dressing the day before for quicker assembly.
Don’t skip the bacon: It adds that crispy, salty bite that takes this salad from good to craveable.
Meal Prep Hack: Store the lettuce and avocado separately if you plan to keep leftovers for a few days.
Final Bite
This isn’t your average “chicken salad.” It’s got grill marks, bold flavors, and picnic-table personality. If your summer needs a new signature dish—this is it.
Let me know if you try it, and tag us in your photos! We love seeing what you’re cooking. ☀️🥗🔥

Why Breakfast for Dinner is the Best—and These Paleo Pancakes Prove It

Let’s be honest: breakfast has never been just for the mornings.
There’s something magical about breakfast foods that transcends time. Fluffy pancakes after a long day? Yes, please. A cozy weekend brunch on a Tuesday night? Absolutely. Whether it’s first thing in the morning with the sun coming up or last thing at night when the kids are finally asleep—breakfast always hits the spot.
And these Best Paleo Pancakes? They’re the perfect excuse to break out the skillet any time of day.
I created this recipe for those moments when you want something warm, comforting, and satisfying—but still simple, clean, and quick to whip up. No gluten, no dairy, no refined sugar. Just wholesome ingredients, a few minutes of prep, and a stack of golden, fluffy perfection.
What Makes These Pancakes So Good?
These pancakes are:
Light and fluffy thanks to a blend of almond, tapioca, and coconut flour.
Naturally sweetened with a touch of honey or maple syrup.
Easy to make (seriously—you’ll be done in under 15 minutes).
Perfect for kids and adults alike.
Totally freezable, so you can meal prep and enjoy them all week long!
My secret weapon? A splash of vinegar! It might sound odd, but it’s the trick to making these pancakes extra fluffy. I use white wine vinegar, but apple cider vinegar or even lemon juice works in a pinch.
Pro tip: I’m low-key obsessed with my pancake pen. It makes perfectly round pancakes every time, which is especially great if you’re cooking for little ones who will notice if one is “weird looking.” 😆
Paleo Pancake Recipe
Dry Ingredients:
½ cup almond flour (super-fine from blanched almonds is best!)
⅓ cup tapioca flour
¼ cup coconut flour
½ tsp baking soda
¼ tsp salt
Wet Ingredients:
4 large eggs
¼ cup almond milk
1 tbsp honey or maple syrup
1 tsp white wine vinegar (or any vinegar)
1 tsp vanilla extract
Ghee, butter, or coconut oil for the skillet
Instructions:
Whisk all dry ingredients together in a bowl.
In another bowl, whisk the wet ingredients.
Combine the wet with the dry and mix until smooth.
Heat your skillet on medium-high and coat with your choice of fat.
Spoon batter into small rounds—about 3–4 inches wide is ideal. Cook 2–3 minutes on the first side, flip, then another 1–2 minutes on the other.
Serve warm with your favorite toppings: bananas, berries, nut butter, or classic maple syrup.
Make Them Ahead!
This recipe easily doubles—and trust me, you’ll want leftovers. Just pop the extras in the freezer, then reheat in the toaster or microwave whenever the pancake craving strikes (a.k.a. always).
Whether it’s Saturday morning or Wednesday night, breakfast will always be my favorite meal—and with these paleo pancakes, it’s easier than ever to enjoy it whenever you want.
Happy flipping! 🥞✨

Why Soup in Summer? Because This Paleo Sausage Veggie Soup Is What Your Garden Dreams About 🌿🍲

I know what you’re thinking—soup in the summer? Isn’t that what fall is for? But hear me out: there’s something magical about a big pot of soup simmering on the stove while the summer sun beams through the kitchen window. When the veggies are fresh from the garden or farmers market, the flavors hit different. And when it’s loaded with protein, color, and comforting goodness without being heavy, it just works.
Enter: Paleo Whole30 Sausage Summer Vegetable Soup—aka your new warm-weather go-to. It’s hearty without being hot-flash-inducing, light without being boring, and packed with all the best summer produce. Plus, it’s gluten-free, dairy-free, low FODMAP, and customizable depending on what’s in your fridge. This is meal prep gold and tastes even better the next day (or out of the freezer).
Let’s start with the star of the show: the homemade Italian sausage.
🌟 Paleo Whole30 Homemade Italian Sausage
This sausage is juicy, perfectly seasoned, and free from any funky fillers. You can make it as patties or keep it ground—either way, it’s flavor-packed and super easy.
Ingredients:
2 pounds ground pork
2 tablespoons garlic oil*
1 ½ tablespoons Italian seasoning (check for no onion or garlic)
1 tablespoon dried parsley
1 teaspoon red pepper flakes
1 teaspoon paprika
2 teaspoons salt
1 teaspoon black pepper
1 teaspoon fennel seed
Instructions – For Ground Sausage (what you’ll use in the soup):
In a large skillet, heat garlic oil over medium heat.
Add pork and cook until mostly browned, about 5–7 minutes. Drain excess fat if needed (a little is fine!).
Stir in Italian seasoning, parsley, red pepper flakes, paprika, salt, pepper, and fennel seed. Cook for another 2–3 minutes until well combined.
Remove from heat and set aside for the soup.
*Note: If you're not following low FODMAP, you can sub 1 tsp garlic powder instead of garlic oil.
🍅 Paleo Whole30 Sausage Summer Vegetable Soup
Fresh, colorful, and easy to throw together—this soup is like summer in a bowl.
Ingredients:
2 pounds ground Italian sausage (from recipe above)
6 medium tomatoes, chopped
1 pound carrots, diced
2–3 cups chopped bell peppers (avoid green for a sweeter flavor)
1 bunch green onions, chopped
6–7 cups water
1 teaspoon salt (plus more to taste)
2 scoops bone broth powder (optional, but boosts the nutrients)
5 medium zucchini, chopped
Fresh basil, chopped (for garnish)
Instructions:
In a large saucepan or soup pot, add your cooked Italian sausage and place over medium heat.
Stir in tomatoes, carrots, bell peppers, green onion, water, salt, and bone broth powder.
Raise heat to medium-high and bring to a boil.
Once boiling, reduce to medium-low, cover, and cook for 20 minutes, stirring occasionally.
Add in zucchini, remove the lid, and cook for 10 more minutes.
Taste and adjust salt if needed. Serve hot with plenty of fresh basil on top.
Bonus: This soup freezes beautifully—so make a big batch and stash some away for a no-stress dinner on a busy day.
Wrap-Up:
Who says soup is just for sweater weather? With summer produce in full swing and a light, flavorful broth, this Paleo Whole30 Sausage Summer Vegetable Soup proves that soup season is year-round. Whether you're meal prepping, feeding a crowd, or just trying to use up what’s in the crisper drawer, this one’s a winner.

Salmon BLT Salad with Chive Ranch — A Summer Staple That Never Disappoints

If there's one meal that screams summer around our house, it's this Salmon BLT Salad with Chive Ranch Dressing. It's bright, fresh, satisfying, and comes together without heating up the whole kitchen — a very real win here in Arizona, where turning on the oven in July feels like playing with fire. Literally.
This salad came to life on one of those “we should grill tonight” evenings when we had salmon thawed, a few stray avocados begging to be used, and some bacon crisped up from breakfast. I threw everything over greens, tossed together a quick ranch with chives from the garden (they somehow survive the Phoenix heat!), and it became an instant family favorite.
It’s become our go-to meal for backyard dinners, quick lunches, or anytime we want to feel fancy without the fuss. Plus, it’s paleo, Whole30, and keto-friendly — but you’d never know it from the flavor.
Here’s how to make it:
🥗 Salmon BLT Salad with Chive Ranch Dressing
Serves: 6
Perfect for: Summer grilling, backyard dinners, or when you want something light but filling.
Chive Ranch Dressing
1/4 cup plain unsweetened almond milk
1/2 cup paleo mayo (store-bought or homemade)
1 tbsp lemon juice
1 tsp fresh minced dill (or 1/4 tsp dried)
1 garlic clove, minced
2 tbsp chopped fresh chives
Sea salt & black pepper, to taste
To make:
Whisk the almond milk, mayo, lemon juice, and dill until smooth. Stir in the garlic and chives, then season with salt and pepper. Chill while you prep the rest — it gets even better as it sits!
Perfectly Seasoned Salmon
1 lb salmon fillets (3–4 pieces, skin on or off)
3/4 tsp garlic powder
3/4 tsp onion powder
3/4 tsp smoked paprika
3/4 tsp sea salt
1/8 tsp black pepper
1 tbsp bacon fat, avocado oil, or ghee (for cooking)
To cook:
Pat the salmon dry. Mix your spices and rub generously all over the fillets.
Grilling? Brush the fish with oil and place flesh-side down on a hot grill for about 3 minutes. Flip and cook another 3–4 minutes, skin-side down, until flaky and cooked through.
Pan-frying? Heat oil in a skillet over medium-high. Place salmon skin-side down and cook about 3 minutes per side, adjusting for thickness. Set aside.
The Salad Base
6 cups mixed greens (romaine, arugula, spinach — whatever you love)
1 cup cherry tomatoes, halved
6 slices bacon, cooked until crispy and crumbled
1 ripe avocado, sliced
1 small red onion, thinly sliced
To assemble:
Layer your greens on a big platter or individual bowls. Add tomatoes, bacon, avocado, and red onion. Gently place the salmon on top and drizzle generously with that chive ranch. Sprinkle extra chives if you’re feeling fancy.
Why We Love It
This salad is everything I want in a summer dinner — it’s light but filling, crisp and creamy, smoky and herby all at once. It tastes indulgent but keeps things clean and nutrient-packed. And bonus: it's just as good the next day (if you manage to have leftovers).
Next time the sun dips just enough to fire up the grill, give this a try. It might just become your new seasonal staple too.
Let me know if you make it — I’d love to hear how it turns out for you!

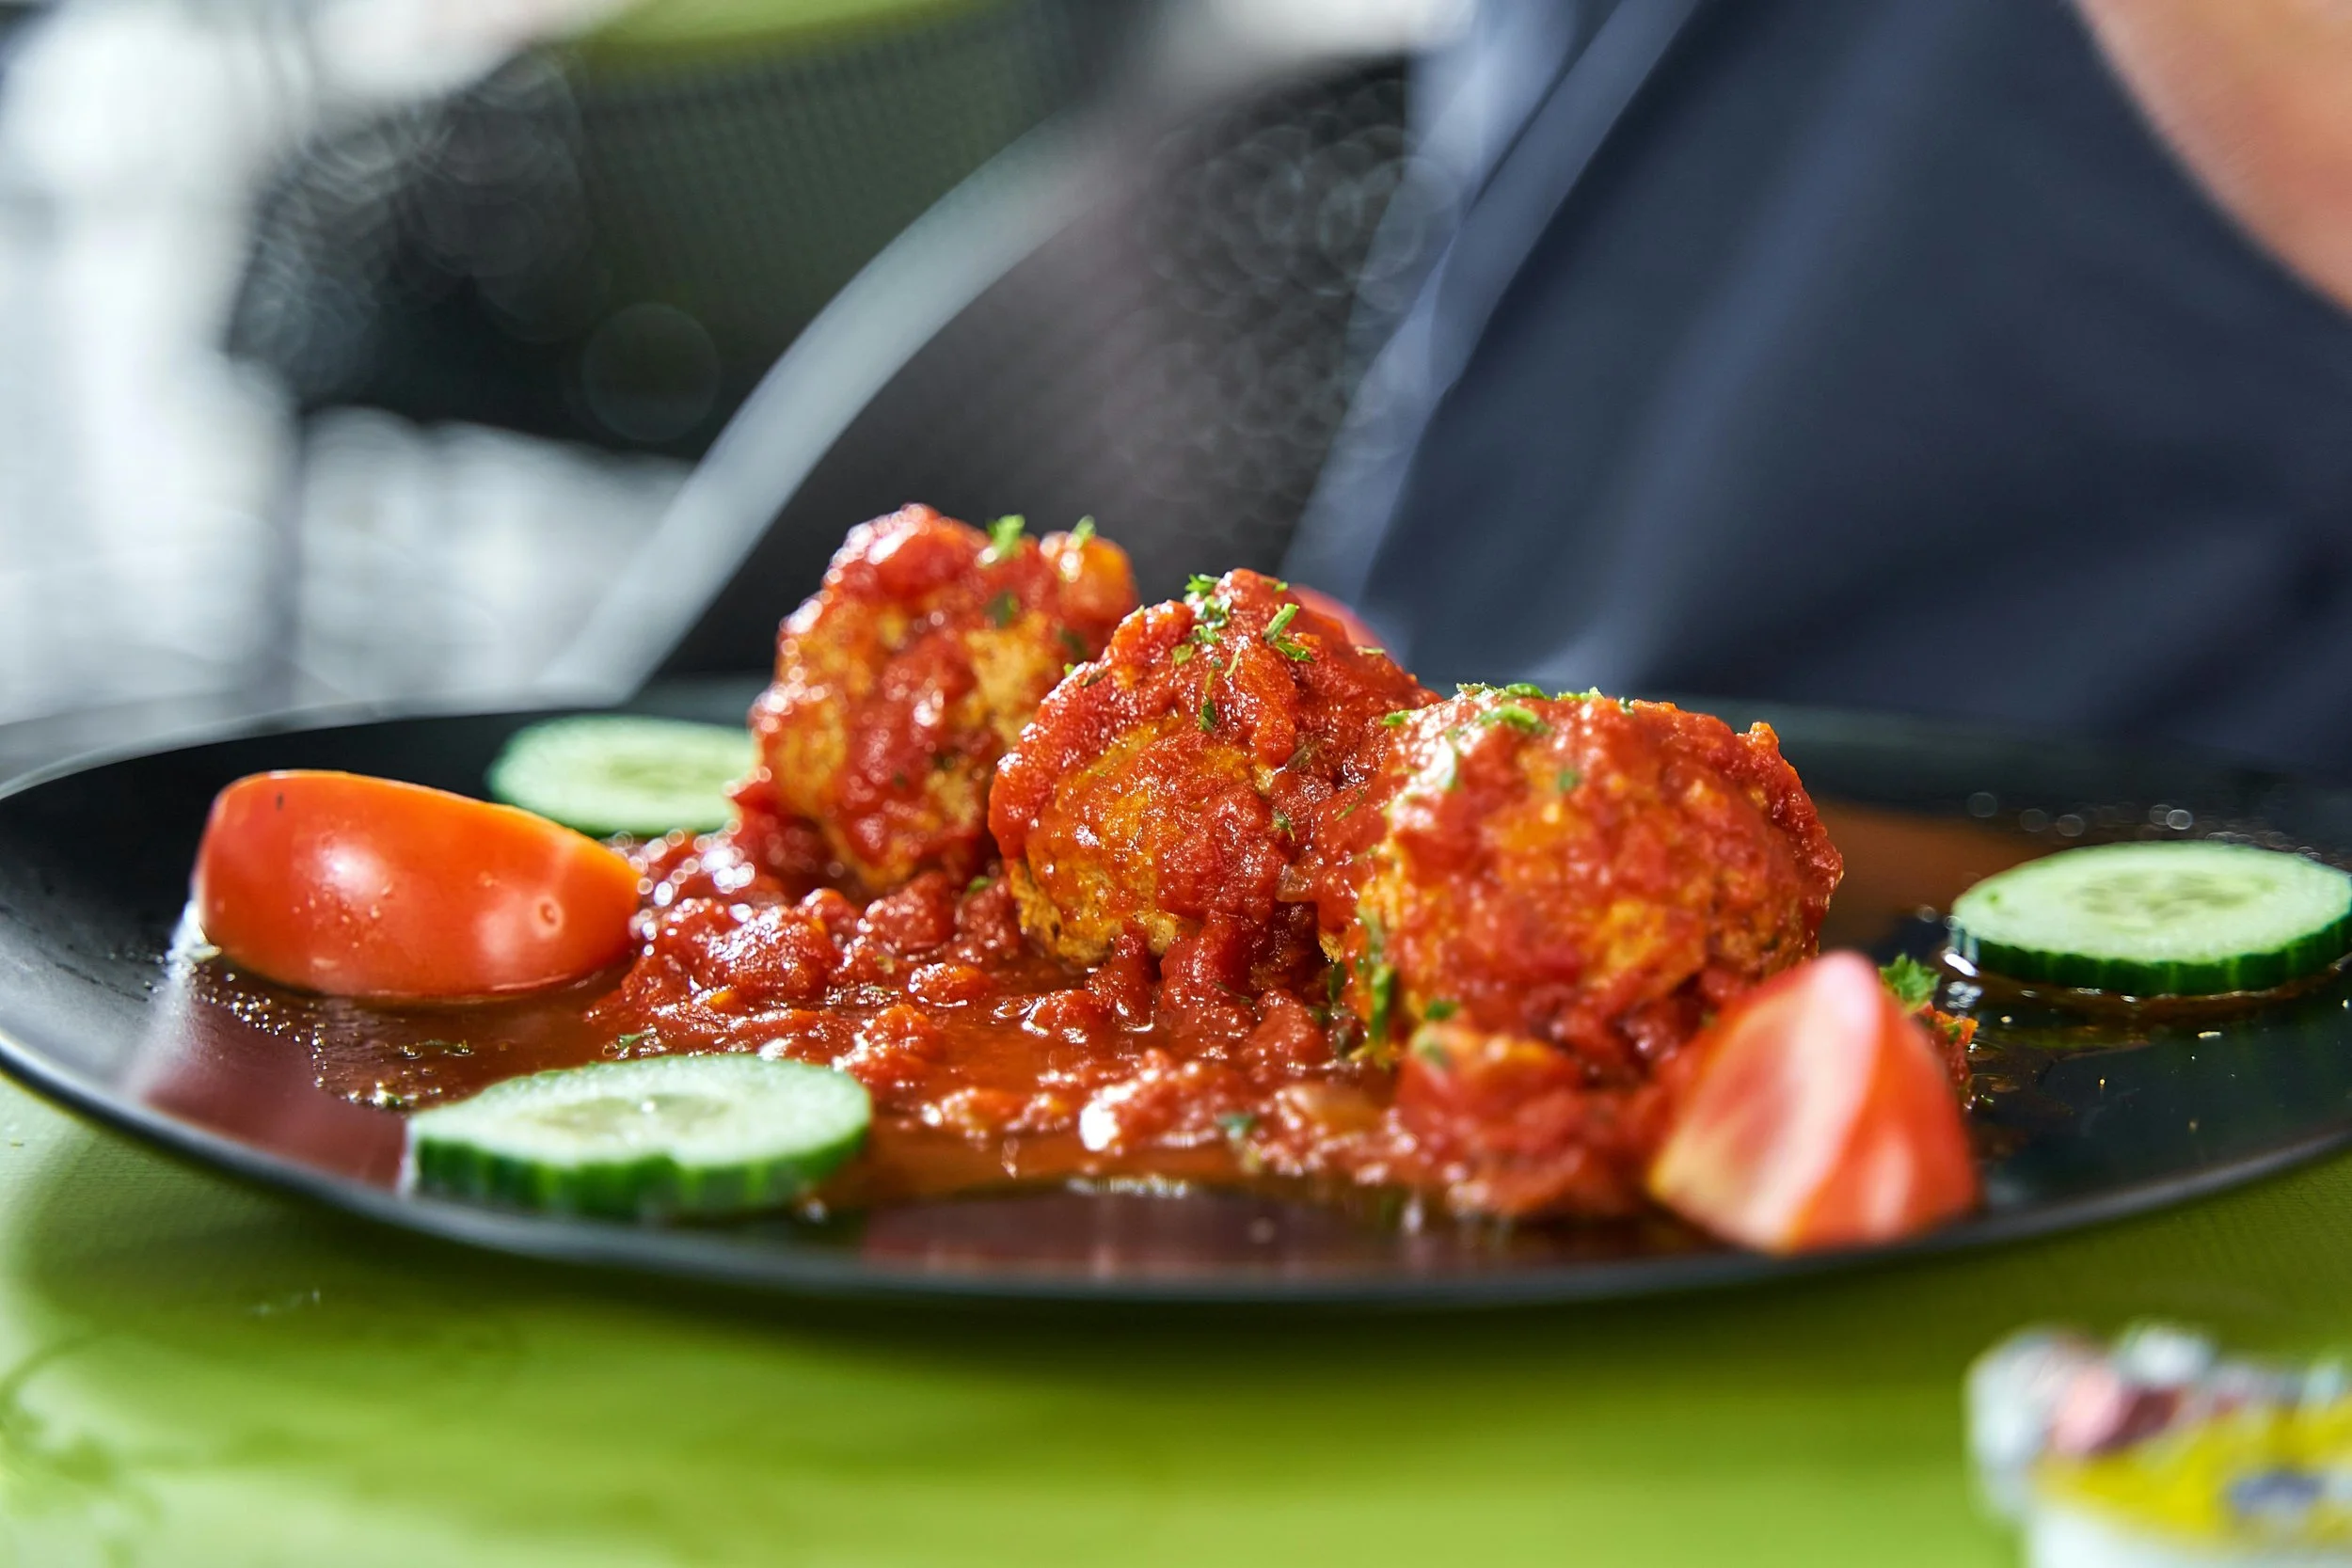
A Go-To Dinner for Picky Eaters: Gluten-Free Turkey Meatballs with Simple Marinara 🍝

If you’ve got picky eaters at home (we definitely do!), you know the dinner struggle is real. One day they love something, the next day it’s “gross,” even if it’s the exact same meal. That’s why I always keep a batch of these Gluten-Free Turkey Meatballs on hand—they’re flavorful, moist, and totally kid-approved. Plus, they’re packed with hidden goodness thanks to fresh herbs, protein-rich turkey, and just enough cheesy flavor to win over even the most skeptical little food critics.
And here’s the best part? These freeze beautifully. I make a double batch on the weekend, pop half in the freezer, and boom—stress-free dinners during the week. They’re perfect over gluten-free pasta (like cassava flour noodles), zoodles, or even tucked into a lunchbox with a little marinara for dipping.
🍅 Easy Homemade Marinara Sauce (That Kids Actually Eat)
You can totally use your favorite jarred sauce, but if you’ve got 15 minutes, this super easy marinara is a total win. It’s fresh, flavorful, and skips all the added sugar you’ll often find in store-bought versions.
Ingredients:
2 tbsp olive oil
3 garlic cloves, minced
1 (28 oz) can crushed tomatoes
1 tsp dried oregano
1/2 tsp onion powder
Salt to taste
Optional: pinch of coconut sugar or a shredded carrot for natural sweetness
Instructions:
Heat the olive oil in a saucepan over medium heat.
Add garlic and sauté until fragrant (about 1 minute—don’t let it burn!).
Pour in crushed tomatoes and stir in oregano, onion powder, and a pinch of salt.
Let it simmer for 10–15 minutes, stirring occasionally.
If your kids prefer a smoother texture, blend it up with an immersion blender.
Boom. Fresh, tasty sauce with zero weird stuff.
🦃 Gluten-Free Turkey Meatballs (Kid-Approved!)
Ingredients:
1 lb ground turkey
1/3 cup gluten-free breadcrumbs
1/4 cup grated Parmesan (or dairy-free alternative)
1 egg
2 garlic cloves, minced
1/4 small onion, finely diced
2 tbsp olive oil
2 tbsp chopped fresh basil
1 tbsp chopped fresh parsley
Salt and pepper to taste
Instructions:
Sauté garlic and onion in olive oil until soft and fragrant. Let cool slightly.
In a bowl, combine ground turkey, breadcrumbs, Parmesan, herbs, egg, sautéed garlic/onion, salt, and pepper. Mix just until combined.
Form into 1.5-inch balls.
In a skillet over medium heat, add a splash of oil and cook meatballs for 10–12 minutes, turning until browned and cooked through (165°F internal temp).
OR: Bake at 400°F for 15–20 minutes.
🍽 How to Serve (and Actually Get Kids to Eat It)
We love these meatballs over cassava pasta with a big spoonful of that marinara. For extra veggies, I’ll sneak in some grated zucchini or spinach into the sauce while it simmers—bonus points if the kids don’t notice 😏.
Other ideas:
Slice and serve them in a gluten-free sub roll with marinara.
Toss over zucchini noodles if your kids are into the spiralized veggie trend.
Add to lunchboxes with toothpicks and a dipping cup of marinara—so fun!
So if you’re looking for an easy win with your crew this week, give these meatballs a go. They’re quick, freezer-friendly, and best of all? No dinner complaints (well…fewer anyway 😉).
Let me know if you try it—and if you manage to sneak in any veggies without getting caught, we need to hear about it.

The Ultimate Summer Salad: Steak Cobb with Creamy Avocado Dressing

As the days get longer and the sun starts showing off a little more, I find myself craving something cool, fresh, and still super satisfying. You know what I’m talking about—when it’s way too hot to turn on the oven, but you still want to eat something hearty that doesn’t feel like you’re settling. That’s where this Steak Cobb Salad with Creamy Avocado Dressing comes in.
I’ve always had a soft spot for a good salad once summer hits full swing. Maybe it’s the crunch of fresh greens or the way a cold forkful of avocado and tomato just hits different when the temps are climbing. But what really seals the deal for me? A salad that eats like a meal. This one checks every box: smoky bacon, juicy steak, creamy avocado, and the most addicting avocado-cilantro-lime dressing that also happens to be dairy-free. It’s a salad that knows how to do summer right.
Whether you're grilling on the weekend or just trying to beat the heat with something wholesome and easy, this salad is ready to be your go-to. It’s Whole30, keto, and paleo-friendly, but honestly, even if none of those labels matter to you, you’ll still be hooked by the first bite.
Let’s get into it!
🥗 Steak Cobb Salad with Creamy Avocado Dressing
{Whole30, Keto, Paleo, Dairy-Free}
Author: Michele Rosen
Prep Time: 15 minutes
Cook Time: 26 minutes
Servings: 6
Ingredients
For the Salad:
1.25 lbs flank steak or strip steak
Sea salt and cracked black pepper
1 tablespoon avocado or olive oil
8 slices nitrate-free bacon (sugar-free for Whole30)
4 large eggs, hardboiled and peeled
8 cups romaine lettuce, roughly chopped (or greens of choice)
1 cup cherry tomatoes, halved
1 small red onion, thinly sliced
1 large avocado, thinly sliced
Optional: Blue cheese crumbles (omit for Whole30 or dairy-free)
For the Creamy Avocado Dressing:
1 medium ripe avocado
1/3 cup Kite Hill almond milk Greek yogurt or sour cream
1/4 cup + 2 tbsp plain almond milk or water
1/3 cup fresh cilantro leaves
1 tsp garlic powder
1/2 tsp sea salt (or more, to taste)
2 tbsp fresh lime juice
Instructions
Prep Ahead:
Cook the bacon until crispy and crumble it once cooled. Hardboil and peel your eggs. (See tips below for methods!)Cook the Steak:
Season steak on both sides with sea salt and cracked black pepper.
Heat a cast iron skillet or grill over medium-high heat and drizzle in oil.
Once hot and slightly smoking, sear the steak for about 3–4 minutes per side, depending on thickness and desired doneness. Use a meat thermometer if needed:130–135°F for medium-rare
135–145°F for medium
Remove from heat, cover with foil, and let rest for 10 minutes.
Assemble the Salad:
In a large bowl or platter, layer your chopped greens, tomatoes, red onion, eggs, bacon, and avocado.
Slice your rested steak and lay it over the top. Add blue cheese crumbles if using.Make the Dressing:
Blend all dressing ingredients in a high-speed blender until smooth and creamy. Adjust salt or lime to taste.Serve:
Drizzle dressing over salad or serve it on the side. Dig in and enjoy!
Notes & Tips
Oven Bacon Tip: Lay bacon on a parchment-lined baking sheet and bake at 400°F for 16–20 minutes until crispy, and you can fold in half to fit more on a baking sheet. Drain on paper towels.
Perfect Hardboiled Eggs: Place eggs in a pot, cover with cold water. Bring to a boil, turn off the heat, cover, and let sit for 16–18 minutes. Transfer to an ice bath to cool, then peel.
This salad is basically summer in a bowl. It’s bold, fresh, filling, and feels like a treat—even though it’s totally good for you. Try it out for your next weeknight dinner, summer BBQ, or meal prep session. I promise you’ll be coming back for seconds (and maybe even licking the spoon after that dressing).
Let me know how it turns out, and tag me if you make it—I'd love to see your version!

Creamy Dairy-Free Vodka Pasta Sauce (Gluten-Free & Vegan!)

Let me take you back to the early days of me and Brittni dating…
I knew I was in deep when I pulled out my ace of spades: homemade pasta and my from-scratch vodka sauce. I’m not saying that meal sealed the deal, but I also know it definitely didn’t hurt. There’s just something special about a dish that’s made with intention—especially when it's rich, comforting, and cooked for someone you’re falling for.
Back then, my original vodka sauce had all the usual suspects—cream, butter, and cheese—but times (and diets) have changed. These days, we eat dairy-free and gluten-free, but that doesn’t mean we’re sacrificing flavor or that signature creamy decadence. This updated version of my OG vodka sauce keeps everything we loved about the original—smooth, velvety texture and bold, balanced flavor—without the dairy.
And the best part? It’s made with simple ingredients, comes together in under 30 minutes, and is just as swoon-worthy as the first time I made it.
CREAMY DAIRY-FREE VODKA SAUCE (GLUTEN-FREE & VEGAN)
This vegan vodka pasta sauce uses soaked cashews to create a luxurious, creamy texture—no heavy cream required. Tossed with your favorite gluten-free pasta, it’s a weeknight dinner that feels like date night.
Ingredients:
1/2 cup raw cashews
Just boiled water (for soaking)
3 tbsp olive oil
1 small onion, finely diced
4 cloves garlic, chopped
1 tsp sea salt
1/2 cup vodka
1 (14.5 oz) can diced tomatoes
1/4 cup tomato paste
Pinch of chili flakes (optional)
1 tsp garlic powder
1 tsp onion powder
2 tsp lemon juice
1 ½ tsp salt
2 tbsp nutritional yeast
12 oz gluten-free pasta
1 1/2 cups reserved pasta water
Salt, to taste
Fresh basil, for serving
Chili flakes, for serving
Instructions:
Soak the cashews
Add the raw cashews to a heatproof bowl and cover with just-boiled water. Let them soak while you prepare the sauce.Sauté the aromatics
Heat the olive oil over medium heat. Add the onion and garlic, and cook until the onions are soft and translucent—about 5–6 minutes.Simmer the sauce
Add vodka, diced tomatoes, tomato paste, chili flakes (if using), garlic powder, and onion powder. Bring to a simmer and cook for 10–12 minutes, until the alcohol has evaporated and the sauce has thickened.Cook the pasta
While the sauce simmers, cook your gluten-free pasta according to package instructions. Be sure to reserve 1 1/2 cups of the pasta water before draining.Blend the sauce
Drain the cashews and add them to a high-speed blender along with the tomato mixture, nutritional yeast, lemon juice, salt, and 3/4 cup of the reserved pasta water. Blend on high until smooth and creamy.Finish the dish
Pour the blended sauce back into the skillet and add the cooked pasta. Toss gently over low heat until the pasta is well-coated. Add more reserved pasta water if needed to loosen the sauce. Taste and adjust salt as needed.Serve
Top with fresh basil, a sprinkle of chili flakes, and enjoy!
Pro Tip:
If your sauce thickens up too much as it sits, just add a splash of water or nut milk to loosen it and re-season with salt.
This one’s for the romantics, the dairy-free dreamers, and anyone who wants to keep pasta night creamy and crave-worthy without the cream. Whether you’re cooking for someone special or just treating yourself—you’re gonna love this one.

The Ultimate Comfort Meal: Easy Chicken Coconut Curry

Spring may be in full swing, but let’s be honest—there’s never a bad time for a warm, comforting meal. Whether you’ve had a long day of chasing the kids, juggling work, or just need something simple yet satisfying, this Easy Chicken Coconut Curry is here to save the day. The best part? It’s a one-pot wonder that comes together in just 30 minutes!
Why You’ll Love This Recipe
Quick & Easy – Ready in half an hour, making it perfect for busy weeknights.
Dairy-Free & Paleo-Friendly – Made with creamy coconut milk for a rich and flavorful sauce.
Customizable Heat – Want it mild? Keep it as is. Craving some spice? Add extra cayenne!
Meal Prep Friendly – Tastes even better the next day, making it great for leftovers.
Ingredients (Serves 6)
1/2 cup cashews
2 tbsp coconut oil or ghee
1/2 onion, diced
3 tbsp curry powder
4 cloves garlic, minced
1/2 inch ginger, grated
1/2 tsp sea salt
1/2 tsp paprika
1/2 tsp ground black pepper
Optional: 1/8 tsp cayenne (or more, to taste)
14.5 oz can crushed tomatoes
1 cup full-fat coconut milk
3 cups diced cooked chicken
1 tbsp fish sauce
Juice from 1/2 lime
Cilantro, basil, or green onions for garnish
How to Cook the Chicken
If you don’t already have cooked chicken on hand, here’s a simple method to prepare it:
Heat 1 tablespoon of coconut oil or ghee in a large skillet over medium-high heat.
Add 3 boneless, skinless chicken breasts (or thighs for extra juiciness) and season with a pinch of salt and pepper.
Cook for about 6-7 minutes per side, or until fully cooked through (internal temperature of 165°F).
Remove from heat, let rest for a few minutes, then dice into bite-sized pieces.
How to Make It
Toast the Cashews – Heat a skillet over medium and toast cashews until fragrant, about 3-4 minutes. Chop and set aside.
Sauté the Aromatics – Heat oil in the skillet, add onions and curry powder, and cook until onions are translucent.
Add Spices – Stir in garlic, ginger, salt, paprika, black pepper, and cayenne (if using). Cook until fragrant.
Simmer the Sauce – Add crushed tomatoes, coconut milk, chicken, and fish sauce. Simmer uncovered for 15 minutes until thickened.
Finish & Serve – Stir in lime juice, garnish with toasted cashews and fresh herbs, and serve warm over rice or cauliflower rice!
Tips & Tricks for the Perfect Curry
🔥 Make it Spicier: Add more cayenne or a diced chili pepper for extra heat. 🥦 Boost the Veggies: Stir in spinach, bell peppers, or zucchini for added nutrition. 🍚 Serving Suggestions: Serve over fluffy jasmine rice or cauliflower rice for a low-carb option. 💡 Meal Prep Win: This curry tastes even better the next day! Store in an airtight container in the fridge for up to 4 days.
This Easy Chicken Coconut Curry is the kind of dish that warms your soul without taking up your whole evening. Give it a try and let me know—what’s your favorite way to enjoy a good curry?

Spring, Baseball, and Grilling: The Perfect Combo for Loaded Taco Sweet Potato Sliders

Spring, Baseball, and Grilling: The Perfect Combo for Loaded Taco Sweet Potato Sliders
Spring is finally here, bringing warmer weather, longer days, and, of course, the start of baseball season! There’s nothing quite like the return of America’s favorite pastime—whether you’re watching from the stands, enjoying a backyard game with friends, or cheering from your living room. And what better way to celebrate the season than firing up the grill and making a delicious meal that captures the essence of both spring and baseball?
Grilling and baseball go hand in hand, evoking memories of hot dogs at the ballpark, tailgates before the big game, and backyard cookouts after a game of catch. If you're looking for a fresh and flavorful dish that brings excitement to your plate, these Loaded Taco Sweet Potato Sliders are a home run! They’re packed with bold flavors, paleo and Whole30-friendly, and perfect for sharing with family and friends.
Loaded Taco Sweet Potato Sliders Recipe
These sliders are a delicious twist on the classic burger, using roasted sweet potato "buns" instead of bread. With seasoned beef patties, creamy guacamole, crispy bacon, and a smoky chipotle ranch, they offer the ultimate combination of flavor and texture.
Ingredients
Sliders:
1-2 medium/large sweet potatoes, scrubbed and sliced into 1/2” thick rounds (10 rounds total)
Avocado or olive oil, plus salt for roasting
1 1/4-1 1/2 lbs grass-fed ground beef (85% lean)
2 tsp taco seasoning
1/8-1/4 tsp chipotle powder (adjust for spice preference)
1 fresh jalapeño, minced
2 cloves garlic, minced
1/2 tsp fine-grain sea salt
Guacamole:
2 medium/large ripe avocados
1/4 cup red onion, minced
2 cloves garlic, minced
1 fresh jalapeño pepper, minced
2 Tbsp fresh lime juice
1/4 cup chopped fresh cilantro (plus more for garnish)
Sea salt to taste
3 slices nitrate-free bacon (sugar-free for Whole30), cooked and crumbled
Chipotle Ranch:
1/2 cup paleo mayo (homemade or store-bought)
1/2 tsp chipotle powder
1 tsp fresh lemon or lime juice
1 tsp onion powder
1/2 tsp garlic powder
1/2 tsp smoked paprika
1 tsp dried chives
Optional: salt to taste
Instructions
1. Roast the Sweet Potato “Buns”
Preheat oven to 425°F and line a baking sheet with parchment paper.
Brush both sides of each sweet potato round with oil and arrange on the baking sheet.
Roast for 15 minutes, flip, and roast for another 10-15 minutes until soft and slightly browned.
2. Make the Sliders
In a bowl, combine ground beef, taco seasoning, chipotle powder, minced jalapeño, garlic, and salt.
Form mixture into 10 small patties.
Heat a skillet or grill over medium-high heat and brush with oil.
Cook patties for about 2-3 minutes per side until desired doneness.
Transfer to a plate and cover with foil to keep warm.
3. Prepare the Guacamole and Chipotle Ranch
Mash all guacamole ingredients together in a bowl and mix well.
Whisk all chipotle ranch ingredients together until smooth.
Store both in the refrigerator until ready to use.
4. Assemble the Sliders
Place each sweet potato round on a serving platter.
Top with a burger patty, followed by guacamole and crumbled bacon.
Drizzle with chipotle ranch and garnish with extra cilantro if desired.
Serve immediately and enjoy!
Tips & Tricks for the Perfect Sliders
Choose the Right Sweet Potatoes: Look for firm, evenly shaped sweet potatoes for easy slicing.
Grill for Extra Flavor: If you love that classic smoky taste, grill the patties instead of pan-frying them.
Make Ahead for Convenience: You can prep the guacamole and chipotle ranch in advance to save time.
Customize Your Heat Level: Add more chipotle powder or jalapeños if you like it spicy, or tone it down for a milder taste.
Final Thoughts
As baseball season kicks off and the scent of grilling fills the air, there’s no better way to celebrate than with these Loaded Taco Sweet Potato Sliders. Whether you’re enjoying them at a game-day gathering, a spring picnic, or a casual family dinner, they bring bold flavors and wholesome ingredients to your table. So fire up that grill, gather your loved ones, and enjoy the taste of spring!
What are your favorite spring grilling recipes?

Springtime BBQ Bliss: Arizona’s Perfect Broccoli Salad

Spring in Arizona is something special. The desert blooms with bursts of color, the air carries that perfect mix of warmth and breeze, and friends start firing up their grills to celebrate the season. If you’re hosting a backyard BBQ this spring, this Broccoli Crunch Salad is the ideal side dish to add fresh flavor and satisfying crunch to your spread.
Our family has learned that the best BBQ gatherings are the ones that feel effortless — kids laughing in the yard, parents chatting with plates in hand, and a table full of dishes that bring everyone together. This salad fits right in. It’s vibrant, refreshing, and packed with texture — tender broccoli, sweet cranberries, crunchy almonds, and smoky bacon all tossed in a tangy apple cider vinegar dressing. Best of all, it’s easy to prep ahead, which means less stress when you’re entertaining.
Why This Salad Is a BBQ Game-Changer
Living in Arizona, we know spring is the sweet spot for outdoor gatherings — warm enough to enjoy the sunshine, but before the desert heat really cranks up. Dishes like this broccoli salad are perfect because they’re crisp and cool, balancing out those hot-off-the-grill burgers and ribs. Plus, since there’s no lettuce involved, it holds up beautifully at outdoor events without wilting.
The Recipe
Ingredients:
• Kosher salt
• 3 heads broccoli, cut into bite-size pieces
• 2 carrots, shredded
• 1/2 red onion, thinly sliced
• 6 slices cooked bacon, crumbled
• 1/2 cup dried cranberries
• 1/2 cup sliced almonds
• 1/2 cup Avo mayonnaise
• 3 Tbsp. apple cider vinegar
• Freshly ground black pepper
Directions:
1. Bring 4 cups of salted water to a boil in a medium saucepan. While that’s heating, fill a large bowl with ice water.
2. Cook the broccoli for 1-2 minutes until just fork-tender, then transfer it to the ice water to stop the cooking process. This keeps it bright green and crisp. Drain once cooled.
3. In a large bowl, combine the cooled broccoli, shredded carrots, red onion, crumbled bacon, cranberries, and almonds.
4. In a separate bowl, whisk together the mayonnaise and apple cider vinegar. Season with salt and pepper to taste.
5. Pour the dressing over the salad and toss until everything is well coated.
Pro Tips for Hosting with Ease
• Make it ahead: This salad actually gets better after sitting for a few hours, giving the flavors time to mingle.
• Add a touch of sweetness: If you like a hint of sweetness in your dressing, stir in a teaspoon of honey or maple syrup.
• Keep it cool: Since mayo-based dressings are best kept cold, placing the salad bowl over a tray of ice will keep it fresh during your BBQ.
This broccoli salad has become a staple at our springtime gatherings, and I love how it brings color and crunch to the table. Whether you’re hosting friends or just enjoying a relaxed family dinner on the patio, this dish is a surefire hit.
So go ahead — fire up the grill, invite some friends, and let this salad steal the show. After all, Arizona spring is too beautiful not to savor every bite.

Gluten Free Beef and Guinness Stew: A St. Patrick's Day Classic

St. Patrick's Day has always held a special place in my heart. Growing up, our family would gather for a festive dinner, and one year my grandmother surprised us with her unforgettable Beef and Guinness Stew. The rich, comforting aroma filled the house, and from the first bite, I knew this was more than just a meal—it was a tradition in the making.
Fast forward to today, and that iconic Irish stew has become a staple in our home every St. Patrick's Day. It brings back memories of family, laughter, and the warmth of good company. Now, I'm excited to share this classic recipe with you. It’s easy to make, but the magic lies in its slow-cooked richness that only patience can create.
Beef and Guinness Stew Recipe
Ingredients:
2 tbsp olive oil
2.5 lb / 1.25 kg beef chuck, boneless short rib, or any other slow-cooking beef (no bone)
3/4 tsp each salt and black pepper
3 garlic cloves, minced
2 onions, chopped (brown, white, or yellow)
6 oz / 180g bacon, speck, or pancetta, diced
Tapioca slurry to thicken
440ml / 14.9 oz Guinness Beer
4 tbsp tomato paste
3 cups (750 ml) chicken stock/broth (or beef broth)
3 carrots, peeled and cut into 1/2" pieces
2 large celery stalks, cut into 1" pieces
2 bay leaves
3 sprigs thyme (or 1 tsp dried thyme leaves)
Instructions:
Prepare the Beef: Cut the beef into 2" chunks. Pat dry and season with salt and pepper.
Brown the Beef: Heat oil in a heavy-based pot over high heat. Add beef in batches and brown well all over. Remove onto a plate. Repeat with remaining beef.
Cook the Veggies: Lower the heat to medium. If the pot looks dry, add oil. Cook garlic and onion for 3 minutes until soft, then add bacon. Cook until bacon is browned, then stir through carrots and celery.
Build the Sauce:Pour in Guinness, chicken broth/stock, and tomato paste. Mix well to ensure the flour dissolves completely. Add bay leaves and thyme.
Simmer: Return the beef (and its juices) to the pot. The liquid should just cover the contents. Cover, lower heat to a gentle bubble, and cook for 2 hours until the beef is tender. Remove the lid and simmer for another 30-45 minutes until the beef falls apart and the sauce thickens slightly.
Final Touches: Skim off excess fat if desired. Adjust salt and pepper to taste. Remove bay leaves and thyme.
Serve: This stew is heavenly served with creamy mashed potatoes for the ultimate comfort meal.
Cooking Methods:
Oven: Cover and bake for 2.5 hours at 160°C / 320°F. Remove the lid, then cook for an additional 30-45 minutes to reduce the sauce.
Slow Cooker: Reduce chicken broth by 1 cup. Follow steps up to adding the Guinness and broth, then transfer everything to a slow cooker. Cook on low for 8 hours. If needed, thicken the sauce by simmering with the slow cooker lid off or by reducing it on the stove.
Pressure Cooker: Follow the slow cooker steps but cook on HIGH for 40 minutes.
Pro Tip:
Guinness Beer is the magic ingredient that creates the deep, complex flavors in this stew. If you prefer an alcohol-free version, substitute the Guinness with 2 cups of water, 1 tbsp Worcestershire sauce, and 2 beef bouillon cubes.
Happy St. Patrick’s Day!
Whether you're celebrating with friends, family, or simply embracing the Irish spirit, this Beef and Guinness Stew is sure to bring warmth and joy to your table. Sláinte! (health)

Breaking the Breakfast Rut: AIP & Paleo Butternut Squash Breakfast Hash

Mornings can be tough, but coming up with an exciting, healthy breakfast that fits into an AIP or Paleo lifestyle? That’s a whole other level of challenge! If you’ve ever stared blankly into your fridge at 7 AM, wondering how to make breakfast not feel like a chore, you’re not alone. We’ve all been there—reaching for the same old options, only to realize we need something fresh, flavorful, and easy to prepare.
Enter: Sheet Pan Butternut Squash Breakfast Hash.
This recipe is a game-changer for those mornings when you need a quick, nourishing meal without standing over a stove flipping pancakes or scrambling eggs. It’s egg-free, packed with flavor, and made with wholesome, organic ingredients. Plus, it only requires one pan—because let’s be real, no one wants to start their day with a sink full of dishes.
The Secret to a Satisfying Egg-Free Breakfast
For many of us following AIP or Paleo diets, breakfast can feel limited without eggs. But who says you need eggs to have a hearty, protein-packed meal? This dish combines savory ground pork (or chicken/turkey) with sweet butternut squash and apples, plus a hit of fresh herbs and spices to bring everything together. The result? A perfect balance of flavors that will leave you feeling full and energized.
Why You’ll Love This Recipe
✔ Simple & Quick – Just chop, mix, and bake. No babysitting required!
✔ Meal Prep Friendly – Make a batch ahead of time and reheat for stress-free mornings.
✔ Nutrient-Dense – Packed with vitamins, protein, and healthy fats.
✔ Gluten-Free, Dairy-Free, and AIP-Friendly – Wholesome ingredients, zero compromise.
Butternut Squash Breakfast Hash Recipe
Ingredients:
1 lb ground pork, chicken, or turkey
3 TBSP olive oil, divided
1 medium yellow onion, diced
2 cloves garlic, minced
1.5 tsp sea salt, divided
1/4 tsp ground sage
1/2 tsp dried rosemary
1/2 tsp dried thyme
1/2 tsp garlic powder
1/2 tsp onion powder
1/2 tsp red pepper flakes (omit for AIP)
1 small-medium butternut squash, peeled and cut into 1/4-inch cubes (about 3 cups)
1 medium apple, diced (any variety)
3 cups spinach or other leafy green, roughly chopped
Fresh herbs for garnish (optional)
Instructions:
Preheat oven to 425F.
In a large bowl, mix together ground meat, 1 TBSP olive oil, onion, garlic, 1 tsp sea salt, sage, rosemary, thyme, garlic powder, onion powder, and red pepper flakes (if using). Set aside.
In a separate bowl, toss cubed butternut squash, apple, and spinach with remaining 2 TBSP olive oil and 1/2 tsp sea salt.
Spread everything in a single layer across a large parchment-lined sheet pan.
Bake for 20-25 minutes, stirring halfway through to ensure even cooking.
Adjust salt to taste and garnish with fresh herbs if desired.
Tips for the Best Breakfast Hash
Don’t skip stirring halfway through baking! This ensures the butternut squash cooks evenly and prevents any burning.
Make it your own! Swap out spinach for kale or another leafy green.
Meal prep magic: Store leftovers in the fridge for up to 4 days for a grab-and-go breakfast.
Say Goodbye to Breakfast Boredom
With this simple, delicious, and nutrient-packed recipe, breakfast is no longer just an afterthought. Whether you're fueling up for a busy day or just need a comforting, home-cooked meal to start your morning, this Butternut Squash Breakfast Hash is the answer. Give it a try and let me know—what’s your go-to egg-free breakfast? Drop a comment below!

The Perfect One-Pan Garlic-Butter Shrimp with Orzo

here’s something magical about spring evenings—the air is crisp but gentle, carrying just a hint of warmth from the day. It’s the kind of weather that makes you want to linger outside a little longer, soaking in the soft golden light of the setting sun. And what better way to wrap up a perfect spring day than with a dish that’s equally light, comforting, and bursting with fresh flavors?
That’s exactly why this One-Pan Garlic-Butter Shrimp with Orzo has become a staple in our home. It’s the kind of meal that feels elegant enough for a special occasion yet is simple enough to pull together on a busy weeknight. Plus, it’s all made in one pan—meaning less cleanup and more time to enjoy the company of those around the table.
Why You’ll Love This Recipe
One-Pan Wonder – Fewer dishes, more flavor.
Bursting with Bright, Fresh Flavors – A perfect balance of garlic, butter, lemon, and herbs.
Quick & Easy – Ready in just 30 minutes.
Perfect for Spring – Light yet satisfying, this dish pairs beautifully with the season’s fresh ingredients.
What You Need
Ingredients:
1/4 cup unsalted butter, divided or Ghee to keep it Paleo
1/4 cup olive oil, divided
2 medium shallots, finely chopped (about 1/2 cup)
1/2 cup white wine
3 cups vegetable broth
1 1/2 cups uncooked orzo (or gluten-free cassava orzo)
1 1/2 teaspoons kosher salt, divided
6 medium garlic cloves, minced
1 tablespoon grated lemon zest + 2 tablespoons fresh lemon juice (from 2 lemons), plus extra lemon wedges for serving
1/4 teaspoon crushed red pepper flakes
1/4 cup chopped fresh flat-leaf parsley, divided
1 pound large raw shrimp, peeled and deveined
2 tablespoons drained capers, roughly chopped
How to Make It
1. Sauté the Shallots
Heat 2 tablespoons each of butter and olive oil in a large, deep skillet over medium heat. Add the shallots and cook until they soften, about 3 minutes. Pour in the white wine, letting it simmer until it reduces by half, about 2 minutes. Remove from heat.
2. Prepare the Butter Mixture
Spoon 3 tablespoons of the shallot mixture into a bowl. Add the remaining butter and olive oil, whisking to combine. Set aside.
3. Cook the Orzo
Pour the vegetable broth into the shallot mixture in the skillet and bring to a boil. Stir in the orzo and 1 teaspoon of salt. Reduce heat to a simmer, cover, and cook undisturbed for 10 minutes.
4. Marinate the Shrimp
Meanwhile, mix the minced garlic with the remaining ½ teaspoon of salt, then use the flat side of a knife to press it into a paste. Add the garlic paste, lemon juice, red pepper flakes, and 2 tablespoons of parsley to the butter mixture in the bowl. Toss in the shrimp, coating it evenly.
5. Cook the Shrimp
Uncover the skillet and arrange the shrimp in a single layer over the cooked orzo. Spoon the remaining butter mixture over the top. Cover and cook until the shrimp turn opaque, about 4 minutes.
6. Finish & Serve
Remove from heat and sprinkle with capers, lemon zest, and the remaining parsley. Serve immediately with lemon wedges on the side.
Variations to Try
Switch Up the Protein – Swap shrimp for scallops or chicken thighs.
Try a Different Grain – Substitute orzo with quinoa, farro, or even small pasta like ditalini.
Add Veggies – Stir in spinach, cherry tomatoes, or zucchini for extra color and nutrients.
Cheesy Twist – Sprinkle with Parmesan or feta for extra richness.
Add Crunch – Top with toasted pine nuts or crispy bacon for texture.
Storing Leftovers
If you have leftovers (which is rare in our house!), store them in an airtight container for up to three days. Reheat gently on the stovetop with a splash of broth if needed to keep the orzo creamy.
The Perfect Meal for a Spring Evening
Picture yourself enjoying this meal outdoors with a light breeze rustling through the trees, a glass of crisp white wine in hand, and good conversation filling the air. That’s the kind of effortless joy this dish brings—a taste of spring in every bite.
So, the next time you’re looking for a meal that’s easy, flavorful, and made for sharing, give this One-Pan Garlic-Butter Shrimp with Orzo a try. You might just find yourself making it again and again.

The Ultimate Paleo Pizza Night: A Family Favorite

You know that moment when you think you'll never enjoy something again after changing your diet? That was me with pizza. After going paleo, I thought my Friday night pizza tradition was over – until this recipe came along and completely changed the game.
Let me tell you about the night I served this to my skeptical food critic of my 3 kids. They walked into my kitchen, eyebrows raised at the mention of a "paleo pizza," probably expecting something that resembled cardboard with toppings. But the amazing aroma of the garlic-infused crust baking in the oven was already working its magic.
What I love most about this recipe is its versatility. The crust, made with a clever combination of coconut and almond flour, creates a perfect canvas for whatever toppings you're craving. And speaking of toppings, let me share my absolute favorite combination I discovered by happy accident – what I call the "Autumn Harvest Pizza."
Picture this: roasted butternut squash cubes caramelized to perfection, crispy prosciutto, caramelized red onions, and fresh sage leaves, all drizzled with a dairy-free "cream" sauce. For the sauce, I blend soaked cashews with garlic, a touch of coconut milk, and herbs until silky smooth. It's a combination that'll make you forget you're eating paleo!
The Perfect Paleo Pizza Base
Serves: 4
Crust Ingredients
½ cup coconut flour
1 cup almond meal
1 teaspoon baking powder
2 teaspoon garlic powder
4 eggs
3 tablespoon extra-virgin olive oil
½ cup coconut milk
Basic Pizza Instructions
Preheat your oven to 375°F.
In a large bowl, combine coconut flour, almond meal, baking powder, and garlic powder.
Gradually whisk in the wet ingredients until you have a soft batter. Don't worry if it seems different from traditional pizza dough – trust the process!
Spread the batter on a well-greased, rimmed pizza pan. The rim is crucial here – we don't want any spills!
Bake the crust alone for 15-20 minutes.
Add your chosen toppings and bake for an additional 10 minutes.
Essential Sauce Recipes
Quick Nut-Free Basil Pesto
Perfect for those avoiding nuts but craving that fresh pesto flavor
Ingredients
2 cups fresh basil leaves, packed
3 cloves garlic
1/3 cup extra virgin olive oil
1/2 teaspoon sea salt
1/4 teaspoon black pepper
1 tablespoon lemon juice
2 tablespoons pumpkin seeds (optional, for texture)
Instructions
In a food processor, pulse the garlic until finely chopped.
Add fresh basil leaves, salt, and pepper.
With the processor running, slowly drizzle in olive oil until smooth.
Add lemon juice and pulse to combine.
If using pumpkin seeds, add them last and pulse briefly for texture.
Simple Fresh Tomato Sauce
A quick, fresh sauce that beats any store-bought version
Ingredients
4 large ripe tomatoes (or 1 28-oz can whole peeled tomatoes)
3 cloves garlic, minced
2 tablespoons extra virgin olive oil
1 teaspoon dried oregano
5-6 fresh basil leaves
1/2 teaspoon sea salt
1/4 teaspoon black pepper
Pinch of red pepper flakes (optional)
Instructions
If using fresh tomatoes, cut an X on the bottom of each tomato, blanch in boiling water for 30 seconds, then peel and roughly chop.
Heat olive oil in a saucepan over medium heat. Add minced garlic and cook until fragrant, about 1 minute.
Add tomatoes, oregano, salt, and pepper.
Simmer uncovered for 15-20 minutes, stirring occasionally, until sauce thickens.
Turn off heat, tear in fresh basil leaves, and adjust seasoning to taste.
The Ultimate Paleo Pizza Topping Guide
Vegetables
Sun-dried tomatoes
Artichoke hearts
Mushrooms (try a mix of portobello, shiitake, and oyster mushrooms)
Red onion
Eggplant
Diced pumpkin or butternut squash
Roasted bell peppers
Caramelized onions
Fresh arugula (added after baking)
Asparagus spears
Roasted garlic
Zucchini ribbons
Kalamata olives
Brussels sprouts (shaved)
Roasted sweet potato slices
Broccoli florets
Cauliflower (roasted)
Fresh herbs (basil, oregano, thyme, sage)
Spinach
Kale (massaged with olive oil)
Fennel (thinly sliced)
Roasted beets
Proteins
Nitrate-free uncured pepperoni
Prosciutto
Grilled chicken
Nitrate-free bacon
Italian sausage (check ingredients)
Ham (uncured)
Grilled steak strips
Ground beef
Pulled pork
Shredded duck
Anchovies
Smoked salmon (added after baking)
Eggs (cracked on top before baking)
Dairy-Free "Cheese" Options
Almond ricotta
Cashew cheese sauce
Nutritional yeast (for a cheesy flavor)
Dairy-free pesto
Avocado cream sauce
Olive oil drizzle
Tahini drizzle
Fruits
Fresh figs
Pineapple
Sliced pears (great with prosciutto)
Apple slices (perfect with bacon)
Fresh peaches (summer specialty)
Finishing Touches
Fresh microgreens
Balsamic glaze
Chili oil
Fresh herbs
Lemon zest
Hot honey (check ingredients)
Truffle oil
Pine nuts
Pumpkin seeds
Hemp seeds
Winning Combinations
Mediterranean Dream
Artichoke hearts
Kalamata olives
Red onion
Fresh herbs
Prosciutto
Forest Feast
Mixed mushrooms
Caramelized onions
Fresh thyme
Truffle oil finish
Harvest Special
Butternut squash
Sage
Caramelized onions
Prosciutto
Balsamic glaze
Spring Garden
Asparagus
Peas
Zucchini ribbons
Fresh mint
Lemon zest
Breakfast Pizza
Bacon
Eggs
Spinach
Mushrooms
Fresh herbs
Pro Tips
Pre-cook vegetables that release a lot of water (like mushrooms, eggplant, and zucchini) before adding them as toppings.
Add delicate toppings like arugula, fresh herbs, and prosciutto after baking.
Layer your toppings thoughtfully - start with sauce, add pre-cooked vegetables and meats, then finish with fresh ingredients after baking.
Both sauces can be made ahead and stored in an airtight container in the refrigerator for up to 5 days.
Freeze pesto in ice cube trays for easy portioning.
Those skeptical kids I mentioned? Went back for thirds and now requests this pizza and enjoys making it as a family all the time. Sometimes the best recipes come from pushing boundaries and thinking outside the (pizza) box!
Whether you're paleo by choice or necessity, this pizza proves that dietary restrictions don't mean saying goodbye to your favorite foods – just reinventing them in creative new ways. Happy pizza making!

The Ultimate Super Bowl Snack Lineup: Delicious, Shareable, and Game-Day Ready!

The Super Bowl is more than just a game; it’s a time for friends, family, and, most importantly, food! Whether you're in it for the touchdowns, the halftime show, or the commercials, one thing is certain: the snacks need to be on point. These three recipes will take your game-day spread to the next level—each one packed with flavor, easy to share, and perfect for keeping your energy up while you cheer for your team.
The Best Deviled Eggs: A Classic Crowd-Pleaser
Deviled eggs have been a party favorite for decades, and for good reason. They’re creamy, tangy, and the perfect finger food for watching the big game. This version keeps it simple yet flavorful, making them a must-have on your snack table.
Ingredients:
6 large hard-boiled eggs, chilled and peeled
1.5 tbsp mayonnaise
1.5 tsp Dijon mustard
1 tbsp pickle juice
Paprika (for garnish)
Butter lettuce cups (optional)
Directions:
Cut the eggs in half and place the yolks in a bowl. Lay the whites face-up on a platter. If using butter lettuce, set each egg half on a leaf.
Mash the yolks with a fork, then add 1 tbsp mayo, 1 tsp Dijon mustard, and 2 tsp pickle juice. Blend using a hand mixer.
Add the remaining mayo, mustard, and pickle juice, and blend until smooth.
Pipe the mixture into the egg whites using a piping bag or a zip-top bag with the corner cut off.
Sprinkle with paprika and serve chilled.
Peach Ginger Chicken Wings: A Sweet and Savory Game-Day Favorite
Wings are a game-day essential, but these Peach Ginger Chicken Wings take it up a notch with a tangy, slightly sweet glaze. They’re Paleo, AIP, and Whole30 compliant, making them a great option for guests with dietary restrictions.
Ingredients:
1-inch piece of ginger
1 large, very ripe peach
Juice of 1/2 a lime
1/4 cup coconut aminos
1/2 tsp salt
1/2 tsp garlic powder
1/2 tsp onion powder
2 tbsp extra virgin olive oil
1 lb chicken wings
Directions:
Blend all ingredients (except chicken wings) in a food processor until smooth.
Pour 3/4 of the marinade over the wings in a bowl or freezer bag. Marinate for at least 30 minutes or overnight in the fridge.
Preheat the grill to medium heat. Cook wings for 6-7 minutes per side, basting with the remaining marinade halfway through.
Serve warm with optional garnishes like cilantro, lime, and red onions.
Paleo Sloppy Joe Stuffed Sweet Potatoes: A Comforting Classic with a Twist
This recipe combines the nostalgia of classic sloppy joes with the wholesome goodness of sweet potatoes. The result? A hearty, flavorful dish perfect for fueling up during the game.
Ingredients:
For the Sauce:
3 tbsp tomato paste
15 oz can tomato sauce (no salt added)
3 tbsp date paste or maple syrup
3 tbsp apple cider vinegar
1 1/2 tbsp coconut aminos
1 tsp mustard
1 1/2 tsp onion powder
1 1/2 tsp garlic powder
1 tsp smoked paprika
1 1/2 tsp sea salt
For the Beef Mixture:
1 lb grass-fed ground beef
1/2 tbsp olive oil
Sea salt and black pepper
1 small green bell pepper, diced
1 small red bell pepper, diced
1 small yellow onion, diced
3 garlic cloves, minced
Directions:
Whisk together all sauce ingredients in a bowl and set aside.
Heat a skillet over medium-high heat and add oil. Brown the beef, seasoning with salt and pepper. Add diced vegetables and garlic, cooking until softened.
Stir in the sauce and bring to a simmer for 10 minutes.
Serve over baked sweet potatoes or sweet potato “buns.”
Sweet Potato ‘Buns’ Option:
Slice sweet potatoes into 3/4-inch rounds.
Drizzle with olive oil, season with salt and pepper.
Bake at 425°F for about 20 minutes until caramelized.
Game On!
With these delicious, shareable snacks, your Super Bowl party is guaranteed to be a hit. Whether you’re indulging in creamy deviled eggs, savoring sweet and tangy wings, or diving into a hearty sloppy joe, there’s something for everyone to enjoy. Grab your plate, find a comfy spot, and get ready for kickoff!

Slow Cooker Paleo Chicken Tortillaless Soup – A Set-It-and-Forget-It Dinner

There’s something magical about coming home after a long day and being greeted by the aroma of a warm, nourishing meal—ready to serve, no extra effort required. That’s exactly what this Paleo Chicken Tortillaless Soup delivers. It’s one of those slow cooker meals that you can set and forget, letting the flavors meld together all day while you tackle life. When dinner rolls around, all that’s left to do is grab a bowl and enjoy!
Why You’ll Love This Soup
This isn’t just another chicken soup—it’s a creamy, flavorful, and comforting dish without the tortillas but all the goodness of a classic Tex-Mex favorite. It’s packed with:
✅ Protein-rich chicken to keep you full and fueled
✅ Nutrient-dense veggies like bell peppers, zucchini, and tomatoes
✅ Coconut milk for a creamy, dairy-free finish
✅ A hint of spice from jalapeños, chili powder, and cumin
And best of all? It’s completely Paleo, gluten-free, and Whole30-friendly.
The Beauty of a Slow Cooker Meal
Life is busy—between work, family, and everything in between, spending hours in the kitchen isn’t always an option. That’s why this recipe is a game-changer.
Imagine this:
Toss everything into the crockpot in the morning.
Let it simmer all day while you go about your routine.
Walk through the door in the evening to the most incredible aroma.
Shred the chicken, stir in the coconut milk, and boom—dinner is served.
It’s the kind of effortless meal that makes you feel like a kitchen wizard with minimal effort.
Paleo Chicken Tortillaless Soup Recipe
Ingredients
1 yellow onion, finely diced
2 cloves garlic, minced
1 ½ cups chicken or veggie broth
1 large zucchini, diced (optional)
1 green bell pepper, diced
1 jalapeño, diced and seeds removed
2 (10 oz) cans diced tomatoes with jalapeño and cilantro
1.5 lb boneless chicken breasts
2 tsp chili powder
1 tsp cumin
1 tsp smoked paprika
1 tsp oregano
1 ½ tsp sea salt
Black pepper to taste
1 (14 oz) can full-fat coconut milk
Juice of 1 lime
Optional: Fresh cilantro & cayenne for extra spice
Slow Cooker Instructions
1️⃣ Prep & Season: Place the chicken breasts in the crockpot and season with salt.
2️⃣ Add Everything But the Finishers: Pour in the broth, tomatoes, zucchini, bell pepper, jalapeño, and spices.
3️⃣ Let It Work Its Magic: Cover and cook on low for 6-8 hours.
4️⃣ Shred & Stir: Remove the chicken, shred with two forks, and return to the crockpot. Stir in coconut milk and lime juice.
5️⃣ Blend for Extra Creaminess (Optional): Use an immersion blender to blend some of the soup for a thicker consistency.
6️⃣ Serve & Enjoy: Top with fresh cilantro and a pinch of cayenne if you like extra heat.
Instant Pot Instructions
1️⃣ Set Instant Pot to sauté mode, add a splash of olive oil, and cook onions and garlic for 3-4 minutes.
2️⃣ Add all other ingredients (except coconut milk, lime juice, and cilantro) and stir.
3️⃣ Set to pressure cook on high for 14 minutes. Allow natural pressure release for 10 minutes, then manually release the rest.
4️⃣ Remove chicken, shred, then stir back in along with coconut milk and lime juice.
5️⃣ Blend some of the soup for extra creaminess, if desired. Serve with fresh cilantro.
Why This Soup is So Good for You
This soup isn’t just easy—it’s nutrient-packed and supports overall wellness:
🌿 Bone broth aids digestion and supports gut health.
🔥 Garlic, jalapeño, and cumin help fight inflammation and boost metabolism.
🥑 Coconut milk adds healthy fats that keep you full and satisfied.
🐓 Chicken breast provides lean protein for muscle recovery and sustained energy.
The best part? It’s so flavorful, you won’t even miss the tortillas!
Make It Your Own
This soup is super customizable! Try these swaps:
✔ Want it spicier? Add extra jalapeño or cayenne.
✔ Need more veggies? Toss in spinach, mushrooms, or riced cauliflower.
✔ Craving crunch? Serve with crushed plantain chips or toasted coconut flakes.
Set It & Forget It—Then Enjoy!
Whether you’re juggling a busy work schedule, running around with the kids, or just need a stress-free dinner, this Paleo Chicken Tortillaless Soup is a lifesaver. It’s a true dump-and-go meal that rewards you at the end of the day with a bowl of comforting, creamy, and healthy goodness.
Paleo Italian Meatballs: A Family Tradition Made Gluten & Dairy-Free

Growing up in an Italian family, meatballs were a staple at every gathering. I can still picture my grandma in the kitchen, her hands expertly shaping each meatball while sharing stories from the old country. The smell of garlic and herbs would fill the house, and by the time dinner was served, we were all gathered around the table, ready to enjoy a feast.
But as I grew older and adopted a healthier lifestyle, I realized that traditional meatballs—loaded with breadcrumbs and cheese—didn't quite fit my dietary goals. That’s why I set out to create a version that keeps all the flavor and comfort of my grandma’s recipe while being completely gluten-free and dairy-free. Enter my Paleo Italian Meatballs—tender, flavorful, and packed with wholesome ingredients.
Paleo Italian Meatball Recipe
Servings: 24 meatballs
Prep Time: 15 mins
Cook Time: 25 mins
Total Time: 40 mins
Ingredients
3/4 cup almond flour
1/2 cup chicken stock
1 tablespoon olive oil
1 yellow onion, finely chopped
3 cloves of garlic, grated or finely minced
1 pound ground beef (85% lean)
1 pound ground pork (80% lean)
2 eggs
1/2 cup packed finely chopped fresh parsley
1 tablespoon dried Italian herb seasoning
2 teaspoons kosher salt
1 teaspoon pepper
Instructions
Preheat the oven to 425ºF. Line a large rimmed baking sheet with parchment paper or foil and set a wire rack on top.
In a large mixing bowl, combine almond flour and chicken stock. Stir and let it absorb the liquid.
Heat olive oil in a skillet over medium heat. Add onion, garlic, and a pinch of salt & pepper. Cook until onions are golden brown, about 8-10 minutes.
Add the cooked onion mixture to the bowl with almond flour and chicken stock. Add ground beef, ground pork, eggs, parsley, salt, pepper, and Italian seasoning. Mix until fully combined.
Use a large cookie scoop to form meatballs and place them on the wire rack.
Bake for 25-30 minutes or until golden brown and cooked through.
Sauce Ideas
No meatball is complete without the perfect sauce! Here are a few paleo-friendly options to try:
Classic Marinara Sauce: A simple tomato sauce made with crushed tomatoes, garlic, basil, and olive oil.
Paleo Pesto: A blend of fresh basil, garlic, pine nuts, olive oil, and nutritional yeast for a cheesy flavor.
Creamy Dairy-Free Alfredo: Made with blended cashews, garlic, nutritional yeast, and almond milk for a rich, creamy sauce.
Spicy Arrabbiata Sauce: A tomato-based sauce with red pepper flakes for a little heat.
Tips & Tricks
Nut-Free Alternative: Use tigernut flour or pork rind panko instead of almond flour.
Egg-Free Option: Substitute with flax eggs (2 tbsp flaxseed meal + 5 tbsp water).
Serving Suggestions: Serve over zoodles, spaghetti squash, or mashed cauliflower for a perfect grain-free meal.
Storage: Store leftovers in an airtight container for up to 5 days or freeze for up to 6 months.
Whether you’re meal-prepping for the week or hosting Sunday dinner, these Paleo Italian Meatballs are sure to be a hit. They bring all the warmth and nostalgia of my grandma’s recipe—without the gluten and dairy. Enjoy!

Low-Carb Lasagna Soup: A Comforting Bowl of Healthy Indulgence

If you’re anything like me, you have a soft spot for lasagna—layered, cheesy, saucy perfection that feels like a warm hug on a chilly day. But let’s be honest, traditional lasagna isn’t exactly a weeknight go-to or aligned with most New Year health goals. That’s where my Low-Carb Lasagna Soup comes in—a dish that captures all the cozy, savory flavors of lasagna in a single, wholesome bowl.
This recipe was born on a busy weeknight when I craved comfort food without the heavy carbs. With kids running around and a to-do list longer than my arm, I decided to experiment with a “deconstructed” lasagna. The result? A hearty, flavorful soup that’s just as satisfying as the real thing but much easier to prepare and healthier for the whole family.
Even better, this recipe is versatile! You can tweak it to fit paleo, dairy-free, or Whole30 needs without sacrificing that classic lasagna taste. The secret weapon? A dollop of almond ricotta on top—it’s a creamy, tangy dream that ties everything together.
So, grab a pot, and let’s dive into this easy-to-make, soul-warming dish that’s perfect for chilly January nights or meal prepping for a busy week!
Low-Carb Lasagna Soup Recipe
Prep Time: 40 minutes
Total Time: 40 minutes
Servings: 10
Calories: 301 kcal
Ingredients
2 tbsp avocado oil (or oil of choice)
1 lb ground beef (organic, grass-fed preferred)
1 lb breakfast sausage (regular or hot)
4 cloves garlic, minced
28 oz diced tomatoes (with juice)
6 oz tomato paste
1 tsp dried oregano
1-2 tbsp dried basil (to taste)
¼ cup dried parsley
½-1 tsp sea salt (to taste)
¼ tsp ground black pepper
32 oz beef broth (or chicken broth)
1 medium zucchini, sliced thinly
1 tsp balsamic vinegar
Almond ricotta, see recipe below)
Instructions
Sauté the Base
Heat oil in a large pot over medium-high heat. Add ground beef, sausage, and minced garlic, cooking until browned. Break up the meat with a wooden spoon, then drain excess fat if desired.Simmer the Soup
Stir in diced tomatoes, tomato paste, oregano, basil, parsley, salt, pepper, and broth. Bring to a boil.Add the Zucchini
Chop zucchini into thin slices and add to the boiling soup. Cook for 3-5 minutes, until tender.Finish with Flavor
Stir in balsamic vinegar and adjust seasonings to taste. For a richer flavor, add more salt or basil.Top and Serve
Ladle soup into bowls and top with a dollop of almond ricotta or mix it in for a cheesy texture. Enjoy immediately!
Almond Ricotta Recipe
Ingredients:
2 cups slivered blanched almonds
2-3 tsp nutritional yeast
2 tbsp lemon juice
½-¾ tsp sea salt
1 dash garlic powder
¾-1 cup water
Instructions:
Add all ingredients to a high-speed blender, starting with ¾ cup water and ½ tsp salt. Blend until smooth and creamy, about 2 minutes.
Adjust flavors as needed, adding more salt, nutritional yeast, or lemon juice.
Use immediately or refrigerate for up to 7 days.
Don’t skip the balsamic vinegar! It adds depth and balances the flavors.
Whether you're meal-prepping or cozying up for family dinner, this Low-Carb Lasagna Soup delivers all the flavor and none of the fuss. Plus, it’s proof that healthy eating doesn’t mean sacrificing the meals you love. Enjoy!

Whole30 Lettuce Wraps (PF Chang's Inspired)

Prep: 15 minutes | Cook: 20 minutes | Total: 35 minutes
Serves: 4
When I was a teenager, my family always looked forward to our Saturday nights at PF Chang's. It became a bit of a ritual for us—the buzz of the restaurant, the clinking of chopsticks, and, of course, the incredible food. The lettuce wraps were always a favorite. Something about that savory, crunchy, and refreshing bite made them the highlight of every meal.
Fast forward to today, I’m all about recreating those nostalgic dishes but with a healthy twist. As a family focused on wholesome, allergen-friendly meals, this Whole30 version of PF Chang’s lettuce wraps is a winner. It’s Paleo, gluten-free, and dairy-free, and you’d never guess it’s “healthy” because it’s just that delicious.
And the best part? It’s a hands-on meal the kids love assembling themselves. We treat it like taco night, but with a lighter, Asian-inspired vibe. Whether you’re serving this as a quick family dinner or as a crowd-pleasing appetizer, these lettuce wraps will steal the show!
Ingredients
For the Lettuce Wraps:
1/4 cup coconut aminos
2 teaspoons sesame oil
1 teaspoon rice wine vinegar
1 tablespoon almond butter
2 teaspoons freshly grated ginger
1 tablespoon compliant hot sauce (optional)
1 tablespoon olive oil
1/2 of one yellow onion, diced
1 cup baby bella mushrooms, minced
3 cloves garlic, minced
1 pound ground pork or chicken
1/2 cup shredded carrots
Salt and black pepper, to taste
1 8-ounce can diced water chestnuts, drained
3 green onions, thinly sliced (reserve 1 tablespoon for sauce)
1 head bibb lettuce, leaves gently removed
For the Sauce:
1/4 cup coconut aminos
1 1/2 teaspoons sesame oil
1 teaspoon rice wine vinegar
Compliant hot sauce, to taste (optional)
1 tablespoon reserved green onions
Salt, to taste
Suggested Garnishes (Optional):
Sesame seeds
Thinly sliced green onions
Instructions
1. Prepare the Sauce:
In a small bowl, whisk together the coconut aminos, sesame oil, rice wine vinegar, almond butter, grated ginger, and hot sauce. Whisk until smooth and set aside.
2. Cook the Filling:
Heat a large skillet over medium heat and add olive oil. Swirl to coat the pan evenly.
Add the diced onion and cook for 3 minutes until softened. Then, add the minced mushrooms and cook for another 3 minutes until the onion is translucent.
Stir in garlic and cook for 30 seconds until fragrant.
Add ground pork or chicken to the skillet. Cook, crumbling with a spatula, until browned.
Mix in shredded carrots and cook for about 3 minutes until softened.
3. Combine Flavors:
Pour the prepared sauce mixture into the skillet. Stir until everything is evenly coated. Add water chestnuts and green onions, cooking for 3-4 more minutes. Season with salt and black pepper to taste, then remove from heat.
4. Assemble and Serve:
Spoon 3-4 tablespoons of the pork mixture into each lettuce leaf. Garnish with sesame seeds and green onions if desired. Serve immediately with extra sauce on the side for dipping.
Why You’ll Love These Lettuce Wraps
They’re quick to make, adaptable to your favorite proteins, and perfect for busy weeknights. Plus, you can customize the spice level and toppings to your heart's desire.
So next time you’re craving takeout, give this recipe a go. I promise, your family will be asking for these again and again—just like mine does!
What’s your favorite restaurant-inspired dish to recreate at home? Let me know in the comments!

A Healthier Take on Santa's Favorite Treats

Growing up, the magic of Christmas Eve always came with two special traditions in our house: leaving cookies for Santa and sharing a warm glass of eggnog while we decorated the tree. I can still picture my mom in her festive apron, teaching me how to carefully separate egg yolks for her famous eggnog, and the way the whole house would fill with the aroma of chocolate cookies baking in the oven.
As the years passed and I started my own family, I wanted to keep these cherished traditions alive but with a modern, healthier twist. After all, even Santa needs to watch his sugar intake these days! Through lots of trial and error (and many taste tests from my willing family), I've perfected these paleo versions of our favorite holiday treats that taste just as magical as the originals.
## Santa's New Favorite: Paleo Chocolate Crinkle Cookies
These fudgy, rich chocolate crinkles look just like they've been dusted with fresh snow. The best part? They're made with wholesome ingredients like almond flour and natural sweeteners, so you can feel good about leaving them for the big guy in red.
### Ingredients
For the Cookies:
- 1 1/4 cups almond flour
- 1/4 cup raw cacao powder
- 1/4 cup coconut sugar
- 1/4 teaspoon baking soda
- 1/2 teaspoon baking powder
- 1/4 teaspoon sea salt
- 1/4 cup pure maple syrup
- 1 teaspoon pure vanilla extract
- 2 tablespoons avocado oil
- 1 egg
For the Maple Powdered Sugar Coating:
- 2 tablespoons powdered maple sugar
- 1.5 tablespoons arrowroot powder
### Instructions
1. In a mixing bowl, combine almond flour, coconut sugar, cacao powder, salt, baking soda, and baking powder.
2. Add eggs, vanilla, maple syrup, and oil, stirring until a dough forms. Let rest for 10 minutes at room temperature.
3. Preheat oven to 350°F.
4. Make the coating by grinding maple sugar in a coffee grinder until powdered. Mix with arrowroot powder.
5. Using a 1.5 tablespoon cookie scoop, form dough balls and coat generously in the powdered mixture.
6. Place on a parchment-lined baking sheet and bake for 10-12 minutes.
7. Cool completely on the pan before storing.
## Grandma's Eggnog Gets a Makeover
This dairy-free version of our family eggnog recipe still has all the creamy richness and warm spices of the original, but with a lighter, cleaner ingredient list. It's become our new Christmas Eve tradition, and honestly, I think it's even better than the original!
### Ingredients
- 2 cups unsweetened nut milk
- 2 cups coconut cream or coconut milk
- 1 cinnamon stick
- 1 teaspoon freshly grated nutmeg, plus more for garnish
- 6 egg yolks
- 1/2-3/4 cup maple syrup
- 2 teaspoons vanilla extract
- Optional: 1/2-1 cup dark rum or bourbon
### Instructions
1. In a medium saucepan, combine nut milk, coconut cream, cinnamon stick, and nutmeg. Simmer for 8-10 minutes to infuse the flavors. Remove from heat.
2. In a large bowl, whisk egg yolks and maple syrup until light and fluffy.
3. Gradually temper the hot milk mixture into the egg mixture, whisking constantly to prevent curdling.
4. Return everything to the saucepan and cook over medium-low heat for 8-10 minutes, or until the mixture reaches 160°F and coats the back of a wooden spoon.
5. Strain into a clean bowl and stir in vanilla and optional liquor.
6. Chill for at least 6 hours. Before serving, stir well and thin with additional nut milk if needed.
## A Note from the Kitchen
These recipes prove that you don't have to give up holiday traditions to embrace a healthier lifestyle. My kids now help make these treats just like I used to help my mom, and the joy on their faces when they leave the cookies for Santa is just as bright. Plus, I have a feeling Santa appreciates the more nutritious fuel for his long night of deliveries!
Store your cookies in an airtight container for up to 5 days (though they rarely last that long in our house!), and the eggnog will keep well in the refrigerator for up to a week. Happy baking, and may your holidays be filled with the warmth of tradition and the joy of creating new memories!